3 Wire 24 Volt Trolling Motor Wiring Diagram
Get the necessary tools and equipment to wire your 24v trolling system. Take your time and do it.
12 24 Volt Trolling Motor Wiring Diagram Free Wiring Diagram

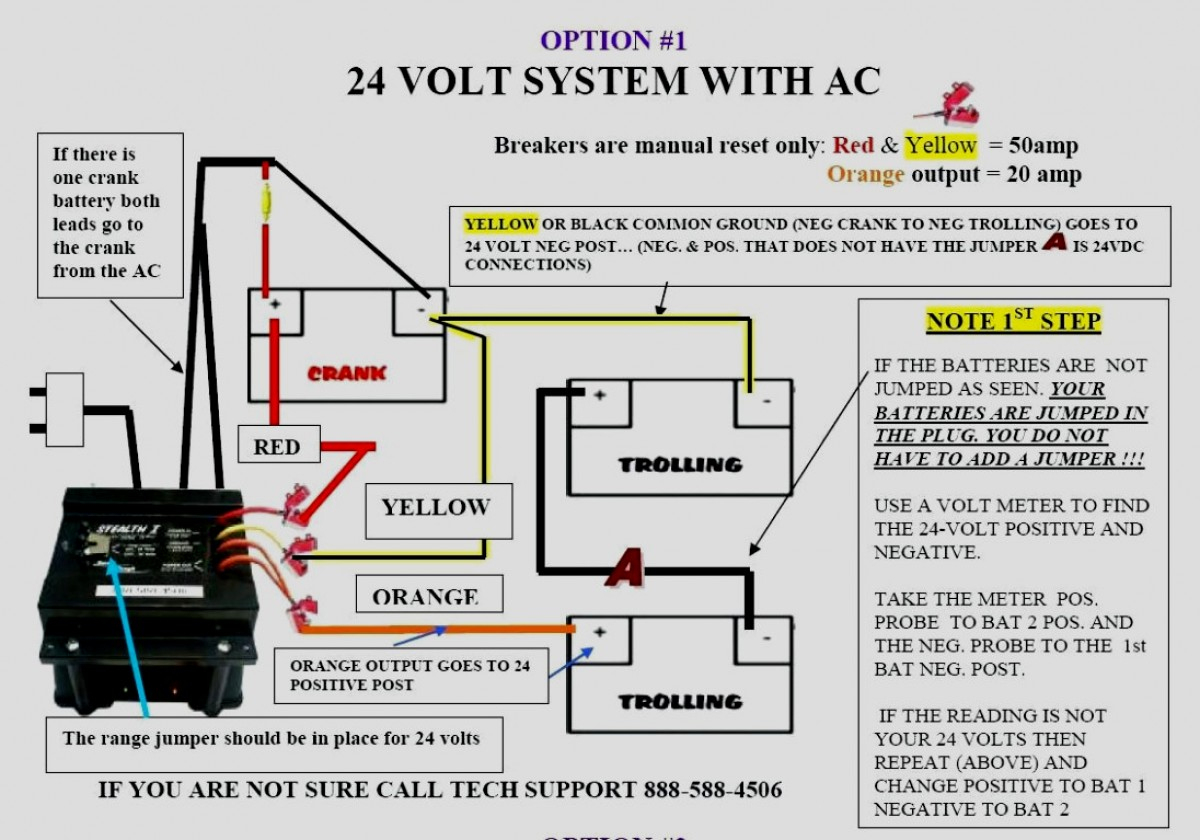
A volt trolling motor requires special wiring between three volt three volt batteries wired in series will put out 36 volts while maintaining the in your wiring as recommended by the motorguide schematic for your.

3 wire 24 volt trolling motor wiring diagram. 1 trick that we 2 to printing a similar wiring plan off twice. Wire in series only as directed in wiring diagram to provide 24 volts. It is important to note you should never feed more voltage into a motor than what it is.
In this case, you need two 12v deep cycle batteries,. So if you have never done it before and you want to give it a shot, here is how to go about it. The wiring is not complex, and you can wire your motor using the schematics below without a professional.
I know the 74lb unit only has 2 wires on the trolling motor plug. Wiring diagram not merely provides detailed illustrations of whatever you can do, but in addition the processes you need to stick to although carrying out so. Print the wiring diagram off plus use highlighters to trace the signal.
Both the 24v and 36v trolling motor wiring. When it comes to wiring a 24v trolling motor, the good news is that it’s not complicated and you don’t need to hire a professional to do it. Schematics also 12 volt led light, 3 phase motor wiring diagrams electrical info pics non, 12 volt toggle switch wiring diagrams wiring diagram and, interactive diy solar wiring diagrams for campers vans, 24 volt wiring diagram for trolling motor batts the, wiring diagram reversible 12 volt motor wiring diagrams, wiring
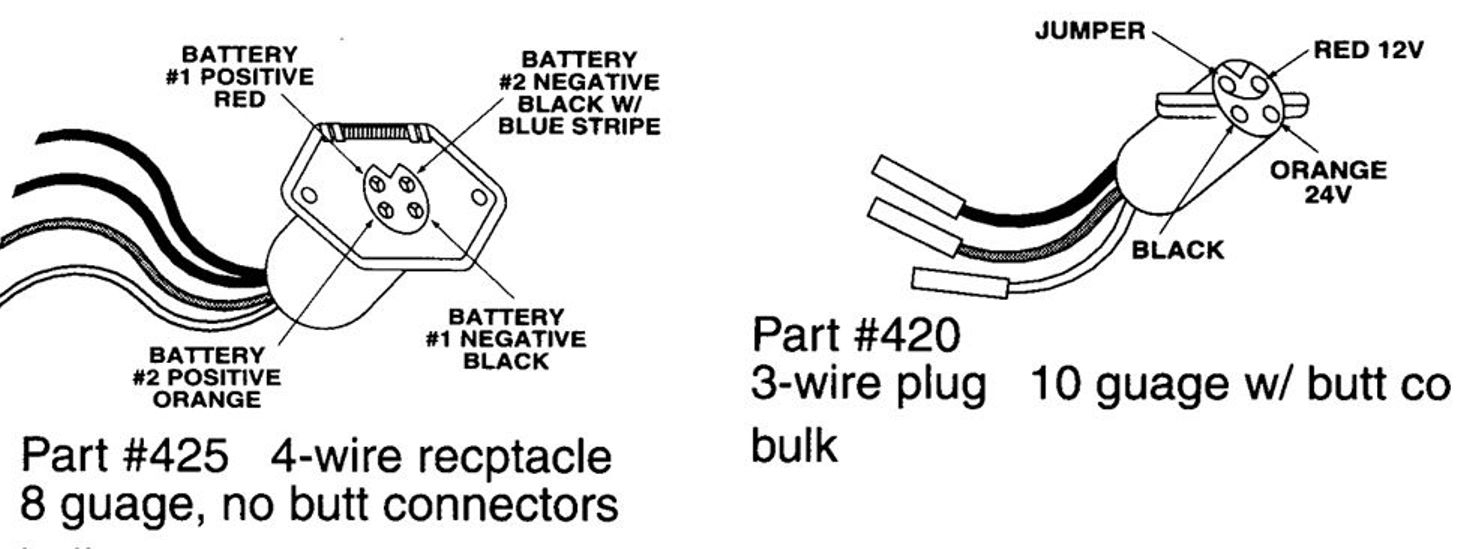
The red and black wires operate the 12 volt side. Install the receptacle on the boat, mount the black plug on the trolling motor and the red plug on the leads of the battery charger. Make sure that the trolling motor is disconnected.
A 24v system requires two 12v batteries that are. The 12v is used to lift/lower the unit. 12/24 volt motors have a switch to choose which you want.
Push the trolling motor wires through the openings at the end of the cover. 24v is used to power the electric motor. Upon one, i’ll trace the current movement, how it.
Connect the red wire from the trolling. The three wires are for a trolling motor that will operate on either 12 volts or 24 volts. The jumper wire used should be one size larger than the trolling motor lead wire.
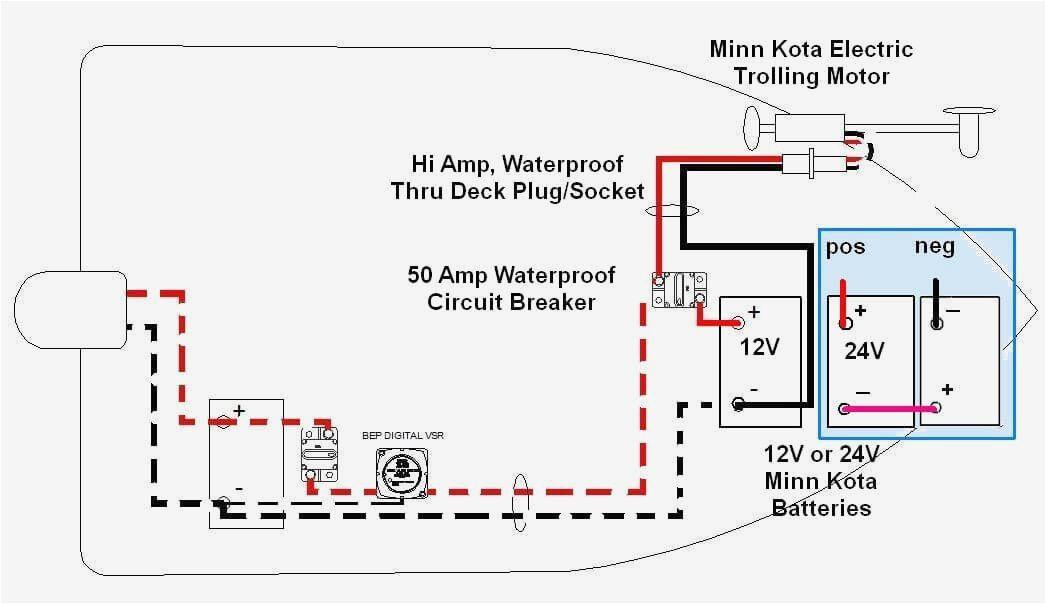
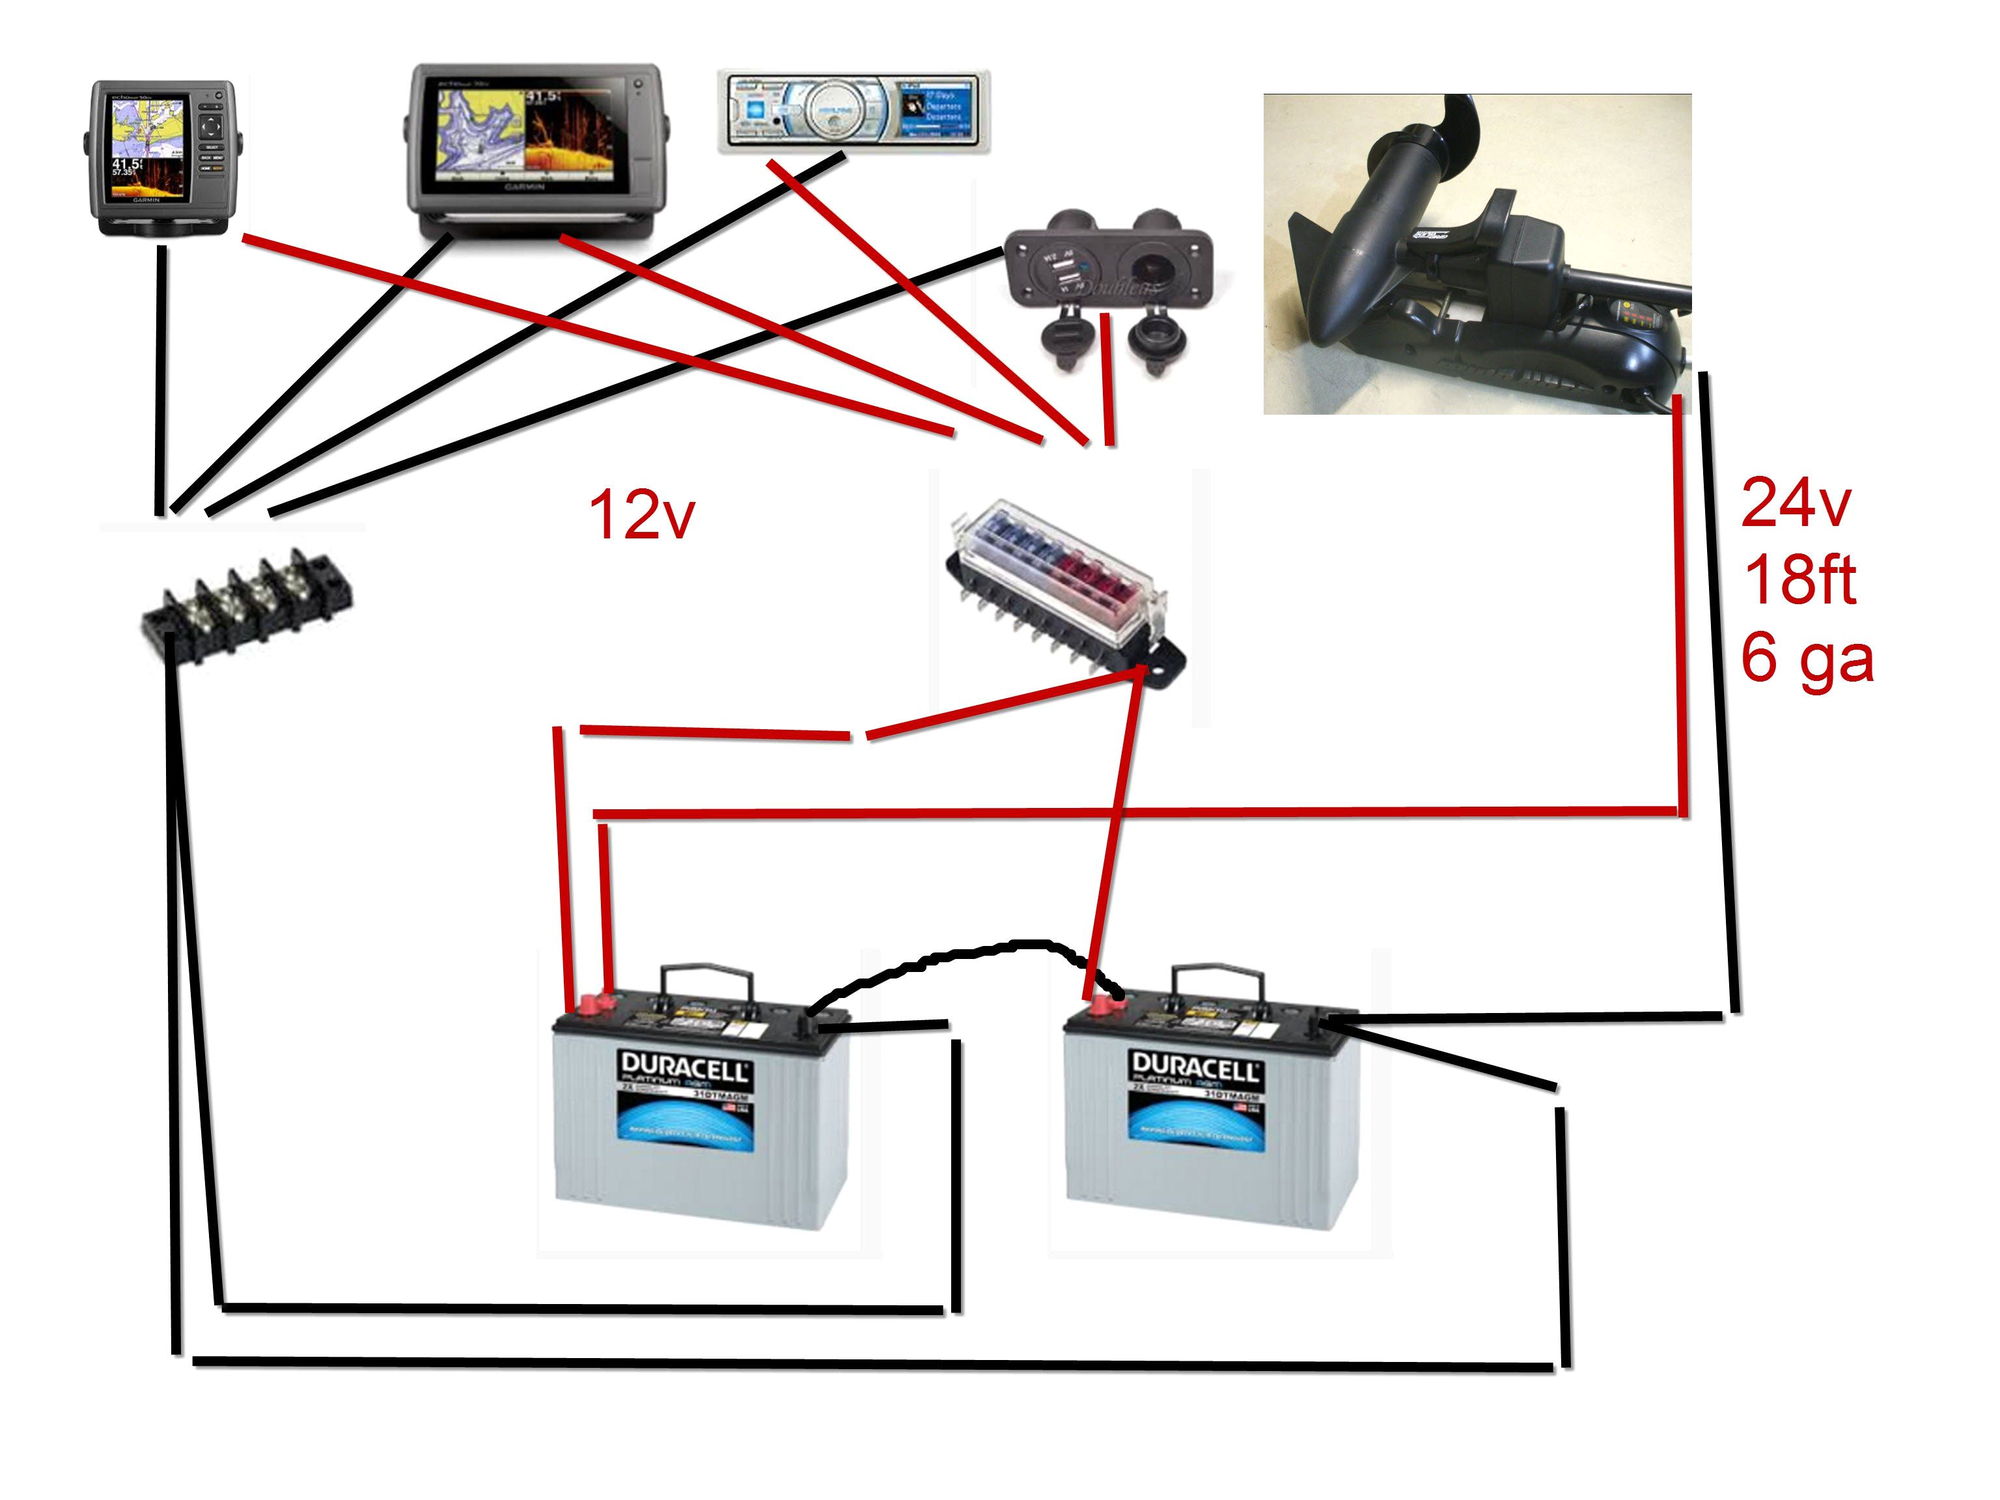
While small and medium trolling motors use a single 12v marine battery, larger trolling motors use larger 24v and 36v systems, and require 2 or 3 marine batteries, accordingly. The two batteries are wired to the receptacle as shown in fig. These larger motors and multiple batteries are wired in a series pattern, and optimally, the circuit breaker should be wired within 4 of your battery.
If not, the structure won’t function as it. Minn kota trolling motor wiring diagram. I bought a marinco br 12/24v receptacle that i was told that i could replace the 3 wire with.
Wire in series only as directed in wiring diagram, to provide 24 volts. Pull the cover off the plug by pulling it back away from the blades. Some of the larger trolling motors will require 36 volts and connecting together 3 x 12 volt batteries in series.
You should be able to find a wiring diagram for your motor on the manufacturer's web site. When you make use of your finger or perhaps the actual circuit with your eyes, it is easy to mistrace the circuit. Each part should be placed and connected with other parts in particular way.
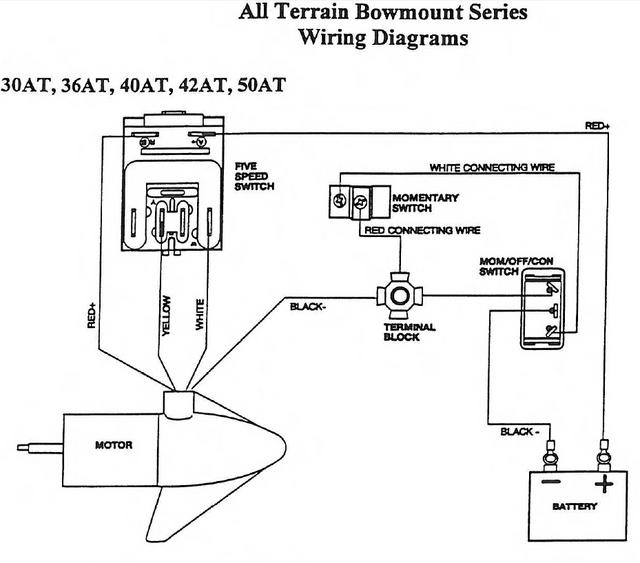
Following is a diagram of how this might be done: Each component should be set. 24 volt trolling motor wiring diagram.
Both the 24v and 36v trolling motor wiring diagrams are listed below along with the recommended circuit breaker. Thus the third wire to send power to the 24 volt side of the switch. Can be used with a 2 or 3 wire system.
On trolling motors with three wires (12/24 or 24/36v), cut out the third hole in the cover. The 24v trolling motor wiring schematic often shows two 12v batteries connected in a series. Connecting two 12v batteries in series provides the 24v power source required to run your motor.
Remove the strain relief by loosening the two strain relief screws. Note the wires that run from the battery to the starter of your engine. Trolling motorwiring motorguide 24 volt motor wiring diagram schematic 3 wires coming from plug 4 wire elimination a purchase is made help with the connectpro batteries system 24v texas fishing forum how to chicago forums battery favorite expertise minn kota 12 model 767 question trollbridge24 information and guide charge v 10.
Make sure that the trolling motor is switched to the off position or speed selector set to 0. Each part should be placed and linked to different parts in specific way. If not, the structure will not work as it should be.
For more information on wiring batteries, please review the conductor gauge and circuit breaker sizing table on our trolling motor wiring and battery guide.
24 Volt Trolling Motor Plug Wiring Diagram
24 Volt Trolling Motor Battery Wiring Diagram Wiring Diagram
12/24 Volt Trolling Motor Wiring Diagram

12 24 Volt Trolling Motor Wiring Diagram

Minn Kota 24 Volt Trolling Motor Wiring Diagram
12 Gauge Wire Trolling Motor Perfect Trolling

How To Wire A 24 Volt Trolling Motor Diagram General

[DIAGRAM] 12 24 Volt Trolling Motor Wiring Diagram Wiring

24 Volt Trolling Motor Wiring Diagram Gallery
24 Volt Trolling Motor Wiring Diagram Ekerekizul
Solarex 120 Watt Wiring Diagram 12/24 Volt 3 Century
OnboardBatteryChargerWiringDiagram RAUR.US
24 Volt Trolling Motor Wiring Diagram
24 Volt Trolling Motor Plug Wiring Diagram

Minn Kota Trolling Motor Wiring Diagram Wiring Diagram
3 Wire 24 Volt Trolling Motor Wiring Diagram Irish
12 24 Volt Trolling Motor Wiring Diagram Free Wiring Diagram

[DIAGRAM] Yamaha Wire Diagram For 36 Volts FULL Version HD
Minn Kota Trolling Motor Wiring Diagram easywiring
